Building an AI-Powered Blog Generator Using Ruby on Rails + OpenAI
Learn how to build an AI-powered blog generator using Ruby on Rails and OpenAI. Step-by-step guide with code examples, prompts, and tips to improve AI-generated content.


Adarsh
Senior Software Engineer


Ever wondered how to build your own AI writing assistant?
Imagine typing just a blog idea and your app drafts the entire article for you in seconds.
In this article, we’ll walk through how to build a simple yet practical AI-powered blog generator using Rails and OpenAI. Whether you're experimenting with Rails AI for the first time or looking to integrate AI into an existing product, this blog will give you a solid starting point.
By the end, you’ll have a working application that can generate full blog posts in seconds and a clear idea of how to extend your Rails AI implementation further.
Why Rails + AI?
Ruby on Rails has always been known for rapid development, and with Rails and AI integration, that advantage becomes even more powerful.
Here’s why developers are increasingly combining Rails with AI:
-
Faster feature development – Add intelligent capabilities without complex ML setup
-
Seamless integration – Easily connect AI APIs into existing Rails workflows
-
Improved productivity – Automate repetitive tasks like content generation using rails AI
-
Scalable architecture – Extend AI features as your application grows
-
Better user experience – Deliver dynamic, personalized outputs in real time
For teams already using Rails, adopting Rails AI integration is a natural next step toward building smarter applications without adding unnecessary complexity.
What We’ll Build
A simple blog platform where you can:
- Enter a topic
- Automatically generate a full blog post using OpenAI GPT API
- Edit and publish instantly
Tools Used
- Ruby on Rails 8
- PostgreSQL
- OpenAI GPT API
- Bootstrap (optional, for UI styling)
Create the Rails App
rails new blog_ai --database=postgresql

cd blog_ai

bundle install

rails db:create
This sets up a new Rails project connected to PostgreSQL.
Generate the BlogPost Model
Run:
rails generate scaffold BlogPost title:string content:text

rails db:migrate
Rails will generate:
- A BlogPost model
- Full CRUD interfaces (index, show, new, edit)
- RESTful routes under /blog_posts
You can now manually create posts from /blog_posts/new.
Connect to OpenAI
This is where the core of your Rails AI integration begins.
1️. Add the Gem
In your Gemfile:
gem 'ruby-openai'
Then run:
bundle install
2️. Configure the Client
Create an initializer file:
# config/initializers/openai.rb

OpenAIClient = OpenAI::Client.new(access_token: ENV["OPENAI_API_KEY"])
Store your key securely (e.g., in .env):
OPENAI_API_KEY=sk-xxxxxxxxxxxxxxxx
Add “Generate with AI” to the Blog Form
In app/views/blog_posts/_form.html.erb:
<%= form_with(model: blog_post, local: true) do |form| %>

    <div class="field">

         <%= form.label :title %>

        <%= form.text_field :title %>

    </div>

   <div class="field">

      <%= form.label :content %>

      <%= form.text_area :content, id: "content_area" %>

   </div>

   <div class="actions">

      <%= form.submit "Save Post" %>

   </div>

<% end %>

<%= button_to "Generate with AI", generate_ai_blog_posts_path(title: blog_post.title), method:

:post, class: "btn btn-secondary mt-2" %>
This adds a button that triggers AI-based content generation.
Create the AI Generator Route and Controller Action
Update Routes
# config/routes.rb

resources :blog_posts do

   collection do

      post :generate_ai

   end

end
Add Controller Logic
# app/controllers/blog_posts_controller.rb

def generate_ai

   prompt = "Write a detailed blog post about: #{params[:title]}"


   response = OpenAIClient.chat(

     parameters: {

       model: "gpt-4",

       messages: [{ role: "user", content: prompt }],

       temperature: 0.7

     }
   )


   generated = response.dig("choices", 0, "message", "content")

   @blog_post = BlogPost.new(title: params[:title], content: generated)

   render :new

end
When you click “Generate with AI,” OpenAI will produce content and prefill it in the new post form.
Display Posts on the Homepage
In app/views/blog_posts/index.html.erb:
<h1>All Blog Posts</h1>


<%= link_to "Write New Post", new_blog_post_path, class: "btn btn-primary mb-3" %>


<% @blog_posts.each do |post| %>

  <div class="card mb-3">

      <div class="card-body">

          <h4><%= link_to post.title, post %></h4>

          <p><%= truncate(post.content, length: 200) %></p>

     </div>

  </div>

<% end %>
You now have a full blog index page!
Advanced: Improving the AI’s Writing Style
Once your basic AI blog generator works, the next step is to refine your Rails AI setup to improve tone, structure, and consistency across generated content.
This can be achieved through two effective approaches.
1. Use a Custom System Prompt
Here’s an example:
system_prompt = <<~SYS

    Write SEO-friendly blog posts in a

    clear, helpful tone. Use H2/H3 headings, short paragraphs, bullet lists,

    and end with a quick checklist + FAQs.

SYS
You can combine this system message with the user’s topic inside your controller:
response = OpenAIClient.chat(

     parameters: {

        model: "gpt-4o-mini",

        messages: [

            { role: "system", content: system_prompt },

            { role: "user", content: "Write a blog post on: Building an AI Blog with Rails" }
    ]
  }
)
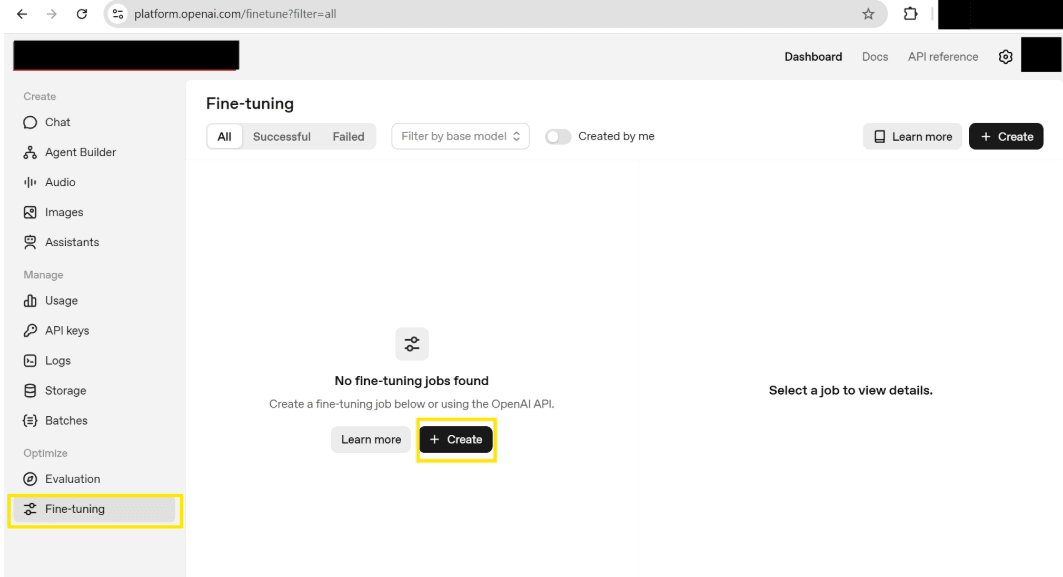
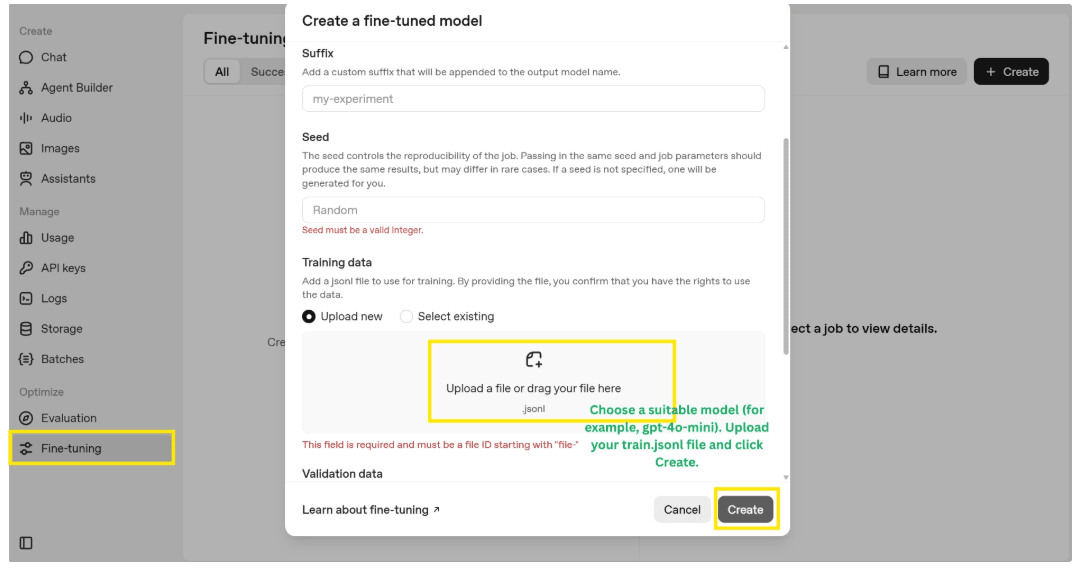
2. True fine-tuning via the OpenAI Dashboard
Step A — Prepare training data (JSONL)
Create a file where each line is a supervised pair. For blog writing, use messages format:
Create a file where each line is a supervised pair. For blog writing, use messages format:
train.jsonl
{"messages":[

    {"role":"system","content":"You are a blog writer for ACME. Same tone and structure as our docs."},

   {"role":"user","content":"Write a post on: Sidekiq background jobs for image processing"},

   {"role":"assistant","content":"<your finished blog post text here>"}

]}
When the job finishes, you’ll see a model like:
ft:gpt-4o-mini:your-org:2025-11-09:abcdef
Update your call:
response = OpenAIClient.chat(

    parameters: {

       model: "ft:gpt-4o-mini:your-org:2025-11-09:abcdef",

       messages: [

           { role: "user", content: "Write a post on: Optimizing Rails ActiveRecord queries" }
       ]
   }
)
Optional: Create jobs via API/CLI instead of UI
-
Upload the file, then create a fine-tune job, then poll for status, then use the returned model.
Fine-tuning API reference: OpenAI Platform
You have just built your first AI-powered blog generator using Ruby on Rails 8 and Open AI.
From here, lot more you can explore:
Add categories, tags, and Markdown support to make your content easier to manage.
Deploy your app to a platform like Render, Fly io or Hatchbox so others can try it out.
Experiment with fine-tuning to help the AI write in your preferred tone and style.
As Rails AI space continues to evolve, developers have more opportunities than ever to build intelligent, scalable applications without leaving the Rails ecosystem.
If you're exploring ways to scale or productionize AI features in your Rails apps, connect with our team at RailsFactory. We work closely with teams to turn Rails AI integration ideas into reliable, production-ready applications.