Rails Installation Made Easy: A Comprehensive Guide for Newbies
New to Rails installation? Follow this step-by-step guide to install Ruby on Rails, fix common errors, and start building your first Rails application.


Pichandal
Technical Content Writer


Installing Ruby on Rails is simpler than it looks when you follow a structured approach. In this article, you’ll learn what Rails is, why it’s still relevant in 2026, the exact steps to install it correctly, common mistakes beginners face, and what to do after your setup is complete.
What Is Ruby on Rails and Why Is It Still Relevant in 2026?
Ruby on Rails is an open-source web application framework written in Ruby. It follows the Model-View-Controller (MVC) architecture and emphasizes convention over configuration to reduce repetitive setup work.
Rails was created by David Heinemeier Hansson in 2004 and has powered platforms like GitHub, Shopify, and Basecamp.
Rails accelerates development by enforcing structure and minimizing configuration decisions.
Why developers still choose Rails
-
Convention over configuration reduces setup time dramatically.
-
Built-in tooling simplifies database migrations and testing.
-
Large ecosystem of gems extends functionality quickly.
-
Opinionated architecture improves code maintainability.
According to the Stack Overflow Developer Survey (recent editions), Ruby consistently ranks among widely used programming languages for web development. Additionally, Rails has over 58,000+ stars on GitHub, reflecting its strong open-source adoption.
For beginners, Rails is especially helpful because its structured approach removes guesswork about project organization.
What Do You Need Before Starting Rails Installation?
Before installing Rails, ensure your system meets a few requirements.
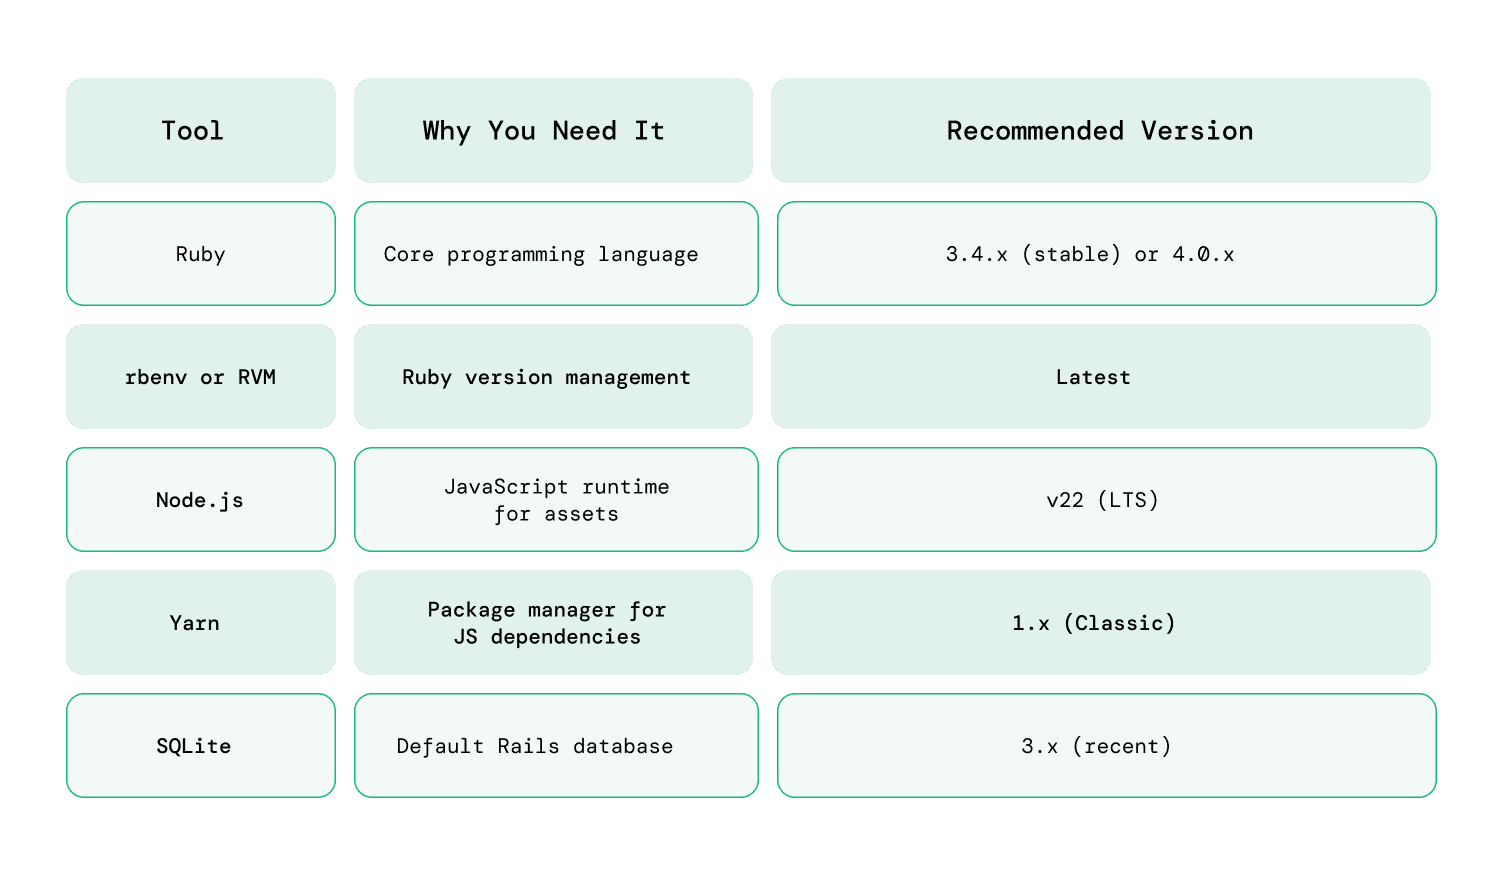
Rails works best on:
-
macOS
-
Linux (Ubuntu preferred)
-
Windows (via WSL recommended)
While Rails can run directly on Windows, using Windows Subsystem for Linux (WSL) reduces compatibility issues.
How to do Rails Installation Step by Step?
Follow these steps carefully for a clean Rails installation.
Step 1: Install a Ruby Version Manager
A version manager allows you to install multiple Ruby versions without conflicts.
Two popular choices:
-
rbenv
-
RVM
The installation process depends on your operating system. For example, on macOS, you can install rbenv using Homebrew:
brew install rbenv ruby-build
After installation, initialize rbenv by running:
rbenv init
Restart your terminal to apply the changes and ensure the version manager is properly configured.
Windows users typically install Ruby through tools like RubyInstaller.
Step 2: Install Ruby
Install the latest stable Ruby version:
rbenv install 3.2.2

rbenv global 3.2.2
Verify installation:
ruby -v
You should see the installed version displayed.
Always verify Ruby installation before installing Rails.
Step 3: Install Node.js and Yarn
Rails uses JavaScript for asset compilation.
Install Node.js (LTS version recommended):
brew install node
Install Yarn:
npm install --global yarn
Verify:
node -v

yarn -v
Step 4: Install Rails
Now install Rails using RubyGems:
gem install rails
Verify installation:
rails -v
Rails installation may take several minutes as it downloads required gems.
Avoid using sudo when installing gems to prevent permission issues.
Step 5: Create Your First Rails Application
Create a new project:
rails new my_app
This generates a structured directory containing:
-
app/ (models, views, controllers)
-
config/
-
db/
-
Gemfile
Rails automatically sets up dependencies and configurations.
Step 6: Run the Rails Server
Navigate into your project folder:
cd my_app
Start the development server:
rails server
Open your browser and visit:
http://localhost:3000
Once Rails installation is completed correctly, you’ll see the Rails welcome page.
What Are the Most Common Rails Installation Errors (and How Do You Fix Them)?
Even in 2026, beginners often run into a few predictable issues during Rails installation. Most of these errors occur due to outdated Ruby or framework versions. In existing production applications, these issues are usually resolved through structured Rails upgrade that ensure compatibility across gems, dependencies, and infrastructure.
Understanding these common pitfalls can help you resolve them quickly and get your development environment running smoothly.
1. Ruby Version Mismatch
Sometimes Rails fails to install or run because the installed Ruby version is outdated or incompatible.
Fix: Use a Ruby version manager such as rbenv or RVM to install and switch to a compatible Ruby version. Always verify the version using ruby -v before installing Rails.
2. Permission Denied During gem install
This error usually appears when Ruby gems are installed using the system Ruby instead of a user-managed environment.
Fix: Avoid using sudo when installing gems. Instead, install Ruby through a version manager so gems are installed in your user environment.
3. “Rails: Command Not Found”
After installing Rails, the terminal may not recognize the rails command. This usually means the system PATH hasn’t updated properly.
Fix: Restart the terminal, run rbenv rehash, and ensure your shell configuration correctly loads rbenv or RVM.
4. SQLite Locking or “Database Is Locked” Errors
With Rails 8, the new Solid Stack (Solid Queue and Solid Cache) often uses SQLite for background jobs and caching. In high-concurrency situations, you may encounter the error SQLite3::BusyException: database is locked.
Fix: Ensure your project uses WAL (Write-Ahead Logging) mode, which Rails 8.1 enables by default. If you're working from a shared filesystem (such as WSL folders or Docker volumes), confirm it supports file locking. You can also increase the database timeout in config/database.yml to around 5000ms to give SQLite more time to handle concurrent writes.
5. Database Setup Errors
Rails uses SQLite by default for development. Errors may occur if SQLite is missing or if the database file cannot be created due to permission issues.
Fix: Install SQLite properly or configure an alternative database like PostgreSQL if your project requires it.
What Should You Do After Installing Rails?
Installing Rails is only the first step. Once your environment is ready, the next goal is to understand how Rails applications work and start building simple features. The best way to learn Rails is by exploring its structure, experimenting with commands, and gradually building small projects.
1. Understand the Rails Folder Structure
When you create a Rails application, the framework automatically generates a structured project layout. Each folder serves a specific purpose and supports the Model–View–Controller (MVC) architecture.
Spend some time reviewing these key directories:
-
app/models – Handles business logic and database relationships
-
app/controllers – Processes incoming requests and coordinates responses
-
app/views – Contains templates responsible for the user interface
-
config/routes.rb – Defines how URLs map to controllers and actions
Understanding this structure early helps you navigate projects confidently and makes debugging or adding features much easier.
2. Generate Your First Feature
Rails provides powerful generators that can quickly create application components. One of the best ways for beginners to understand Rails is by using scaffolding.
Run the following command:
rails generate scaffold Post title:string body:text
Then apply the database changes:
rails db:migrate
After restarting your server, open your browser and visit /posts. You’ll see a fully working CRUD interface where you can create, edit, and delete posts.
Scaffolding is a great learning tool because it demonstrates how models, views, controllers, routes, and migrations work together in a real Rails application.
3. Learn Core Rails Concepts
Once Rails is installed and running, the next step is learning the core ideas that power the framework. These concepts form the foundation of most Rails applications.
Focus on understanding:
-
Routing – How URLs connect to controller actions
-
ActiveRecord associations – Relationships between database models
-
Validations – Ensuring data integrity before saving records
-
RESTful architecture – Designing predictable resource-based endpoints
Rather than studying theory alone, try implementing these concepts in small practice projects. Even simple applications like a blog, to-do list, or note manager can teach a lot about Rails development.
4. Explore Official Resources and the Rails Community
Ruby on Rails has one of the most mature ecosystems in web development. Because the framework has been around for two decades, there is a large collection of documentation, tutorials, and community resources available.
Start with these learning sources:
-
Official Rails Guides – The most reliable documentation for beginners
-
GitHub repositories – Real-world Rails projects you can study
-
Community tutorials and forums – Helpful for troubleshooting and practical tips
Engaging with these resources helps you understand best practices and keeps you updated with new Rails features and improvements.
5. Start Building Small Real Projects
After completing the basic setup and tutorials, the best way to improve your Rails skills is by building practical applications.
Some beginner-friendly project ideas include:
-
A personal blog platform
-
A task management application
-
A simple inventory tracker
-
A note-taking web app
These projects help reinforce important concepts like database migrations, routing, authentication, and API integrations. Over time, building real applications will deepen your understanding of the Rails ecosystem.
Is Rails Installation Really That Difficult?
Not really. It only seems complex when dependencies are unclear. When you install Ruby properly, use a version manager, and verify each step, Rails setup becomes predictable and smooth.
Most Rails installation problems stem from skipped steps or environment conflicts.
By following this updated 2026 guide, you now have:
-
A clean Rails installation
-
A running local development server
-
Awareness of common errors
-
A clear next learning path
Rails continues to power applications worldwide, and your development journey starts with this installation.
If you need help setting up your environment or building a scalable Rails application, our team at RailsFactory can assist with development, Rails upgrades, and long-term maintenance.