Power Apps Unified Changeset Tracking and Comparison
Learn how to extract, unify, and compare Power Apps source files to accurately track changesets between Development and Production environments.


Ameen Abdullah A
Technical Consultant


Objective
The objective of this process is to outline a step-by-step methodology to convert a series of source files extracted from a Canvas Power App into a single unified .txt file. This format allows developers to conduct accurate code comparisons, perform granular file auditing, and precisely track changesets between the Development and Production environments.
Challenge
The primary challenge in Power Apps environments is the native visual limitations regarding change tracking. Unlike traditional modern software stacks (such as React or standard JavaScript applications), you cannot view all changesets simultaneously inside standard text editors or IDEs like Visual Studio Code. Power Apps logic consists of formulas written directly on the triggers, events, and properties of individual UI controls. This architecture makes manually searching and tracking modifications across screens extremely cumbersome, time-consuming, and unsustainable for strict version control or peer reviews.
Tools Required
The execution of this unification workflow requires the following suite of tools and components:
| Tooling Requirement | Purpose |
|---|---|
| Power Apps Studio Editor | Used to download the raw binary application package from the cloud environment. |
| Power Platform CLI | Utilizes the CLI unpack framework (powerapps-cli-1.0.msi) to deconstruct the compiled package. |
| Command Prompt & PowerShell | Executes the precise sequence of OS directory traversals, filter utilities, and recursive script blocks. |
| Visual Studio Code (VS Code) | Serves as the central text diff viewer to analyze structural logic variances line-by-line. |
Procedure for Windows Machine
Follow these commands exactly step-by-step to execute the unification script:
Step 1: Download Source Packages

Download the Power Platform CLI as attached.
Step 2: Open Command Prompt and Inspect Directory
Then open command prompt, cd downloads then dir to check if the downloaded .msapp is present.
cd downloads
dir
Step 3: Unpack the Monolithic msapp File
Then pac canvas unpack --msapp "RSDC Release Planner v2.msapp" --sources "RSDC Release Planner v2" then dir to see if an extracted folder is found named RSDC Release Planner v2
pac canvas unpack --msapp "RSDC Release Planner v2.msapp" --sources "RSDC Release Planner v2"
dir
Step 4: Initialize PowerShell and Inspect Assets
then type powershell then give this Get-ChildItem ".\RSDC Release Planner v2" -Filter *.txt
powershell
Get-ChildItem ".\RSDC Release Planner v2" -Filter *.txt
Step 5: Run Recursive Compilation Pipeline
Execute the text extraction and code unification block inside the console structure:
Get-ChildItem ".\RSDC Release Planner v2\Src" -Filter *.fx.yaml -Recurse |
>> Sort-Object FullName |
>> ForEach-Object {
>> ""
>> "=========================================================="
>> "FILE: $($_.Name)"
>> "=========================================================="
>> Get-Content $_.FullName
>> } | Out-File ".\RSDC Release Planner v2\CanvasApp_AllCode.txt" -Encoding utf8
Procedure for MacOS (MacBook)
On macOS, the fundamental workflow remains identical to Windows, but the terminal environments, directory commands, and scripting languages change. Instead of Windows Command Prompt (CMD) and PowerShell, macOS natively uses the zsh (Z shell) terminal and Unix-based commands. Additionally, the Power Platform CLI on Mac runs natively via the standard shell once installed.
Step 1: Download Source Packages and Tooling
- Open the target Canvas App inside your web browser's Power Apps Studio editor. Select Download a copy to save the. msapp package locally.
- Download and install the Power Platform CLI for macOS. Instead of an .msi installer, this is typically installed using the official macOS PKG installer package or via a terminal installation script.
Step 2: Open Terminal and Navigate to Downloads
Open the Terminal application on your MacBook (found via Spotlight or under Applications > Utilities). Run the following commands to navigate to your downloads directory and list out the files to verify the .msapp binary is present:
cd ~/Downloads ls -la
Step 3: Unpack the Power App Package
Execute the Power Platform CLI extraction tool using your application parameters. The command structure remains identical on macOS:
pac canvas unpack --msapp "RSDC Release Planner v2.msapp" --sources "RSDC Release Planner v2"
Verify that the folder was generated successfully by listing the directory contents:
*ls -d /
Step 4: Compile and Unify Code Natively on macOS
Because macOS does not run Windows PowerShell natively out of the box, you can use the native Unix find and awk commands in the terminal to achieve the exact same recursive compilation result.
Run this single, unified script block in your macOS Terminal:
find "./RSDC Release Planner v2/Src" -name "*.fx.yaml" | sort | while read -r file; do

echo ""

echo "=========================================================="

echo "FILE: $(basename "$file")"

echo "=========================================================="

cat "$file"

done > "./RSDC Release Planner v2/CanvasApp_AllCode.txt"
Dynamic Changeset Comparison (Diffing Tools)
A. VS-Code
Once you have generated the unified text files for both environments (e.g., your Development tree and your Production tree), you must compare them to audit the changesets.
Visual Studio Code provides a highly interactive side-by-side comparative layout that instantly spotlights every modified line across your Power App formula code tree. You can launch it using either your file tree selection or directly via command keys:
- Launch VS Code: Open Visual Studio Code and pull up your primary working target (e.g., your Development code tracking file: .\RSDC Release Planner v2\CanvasApp_AllCode.txt).
- Open the Command Palette: Press the operational shortcut Ctrl+Shift+P (or Cmd+Shift+P on macOS) to bring up the command selector line.
- Execute File Compare: Type Compare File With... in the search pane and select the command.

- Choose Target Asset: Select your comparative environment file (e.g., your Production file tracking path: .\RSDC Release Planner vv_CanvasApp_AllCode.txt_).

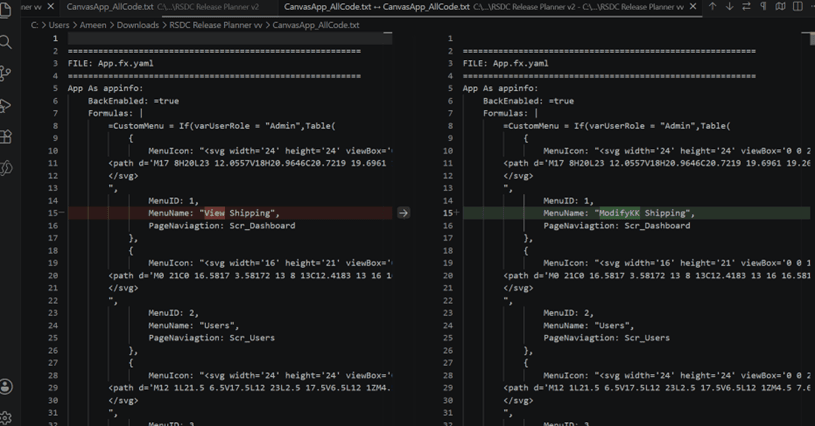
- Analyze the Split View: VS Code will immediately split the editor panel layout into an interactive dual-pane view, mapping line insertions (in green) and logic removals (in red) seamlessly across both target assets.
B. Console-Based Differences via Git Diff (CLI)
For rapid validation directly inside your command prompt console or automated workflows, execute a git diff query. Use the --no-index modifier when your folder directories are not actively managed by an explicit Git repository tracking layout. Run this precise statement:
git diff 'FileName-1' 'FileName-2
Example: git diff '.\RSDC Release Planner v2\CanvasApp_AllCode.txt' '.\RSDC Release Planner vv\CanvasApp_AllCode.txt'
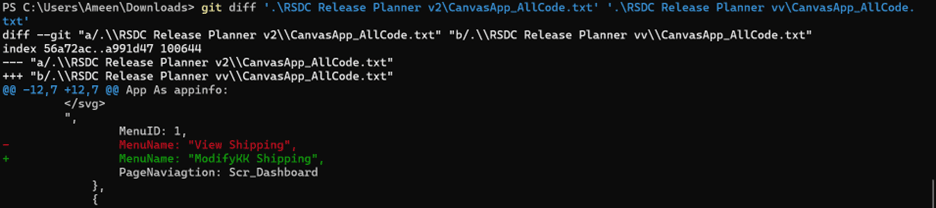
The terminal will display lines prefixed with a minus sign (-) in red text for parameters omitted or changed from the first target document, and lines with a plus sign (+) in green text for newly written control properties.
Output
Then you should see a .txt file created as shown in the snippet. This is an example for an app that we have built you can replace the name of the app to the one you're working on but the process remains same.
🔄 Environment Tracking Framework: Same procedure for prod and you can compare both the files for the exact changeset that has been done.